
How to Make an Herb Wreath - Part 1

Making an herb wreath is one fall weekend activity you’ll really enjoy. It’s a satisfying way to preserve a bit of summer bounty over the winter months.
I grow lots of herbs, and over the years, I've tried many herb wreath-making strategies. Like driving to Chicago, you can reach your destination via any number of different routes. Herb selection, wreath size, construction materials and other factors have an impact on the end product, and that’s a good thing. That way, each wreath is a unique work of art. Here are some things that have worked for me, along with some helpful suggestions.
The Wreath Base

Wreath frames are available online and through local craft outlets in different sizes and materials. From a four-inch ring that makes a nice candle base to a 16-inch behemoth that will grace your front entry, the size of the wreath you choose will depend on your design goals and the volume of herbs you have to work with.
A six-inch wreath, for instance, will make a nice addition to a kitchen wall. It’s large enough to contain plenty of herbs for snipping but isn’t overwhelming. If you plan on cooking with your dried herbs, you'll also want to use a food-safe material.
I should note here that you can also use an artificial pine bough wreath base as a cheat to make your project look fuller if you have a limited herb supply. In deciding to use this method, make sure you have good airflow while your herbs dry. You want all the fresh plant material to dry quickly and completely.
Herb Wreath Assembly

Dried herbs are so fragile they'll usually fragment and shatter during assembly, which requires overlapping the bundles around the form. That’s why fresh herbs are preferred. If you've already harvested and dried your herbs for the season, you can make decorative swags or display them in attractive baskets. Both are projects that typically require less handling and fiddling.
Hangers
If you plan on hanging your herb wreath rather than using it as, say, a candle collar, you'll need a hook, hanging ring or metal strip for the back.
Tools and Supplies

Tarp
Making an herb wreath is the culmination of a season’s work in your herb garden. It's really, really (really) fun, but it can get messy. Place a drop cloth on the flat, stable surface you plan to use. You may want to do this outdoors on your deck or patio. If you’re working outside, prefer a shady spot, at least in the area where you intend to keep your cut herbs during the assembly process.
Tools
You’ll need to cut plant stems and cut or bend wire or pins to make sturdy, attractive bundles and attach them securely. Decide what implements will be helpful, and get them together before starting your project. I speak from experience. After cutting the herbs you plan to use, it’s a good idea to assemble your bundles and add them to the wreath as soon as possible before the herbs begin to wilt.

Depending on your choices above, your inventory of tools and
materials will include:
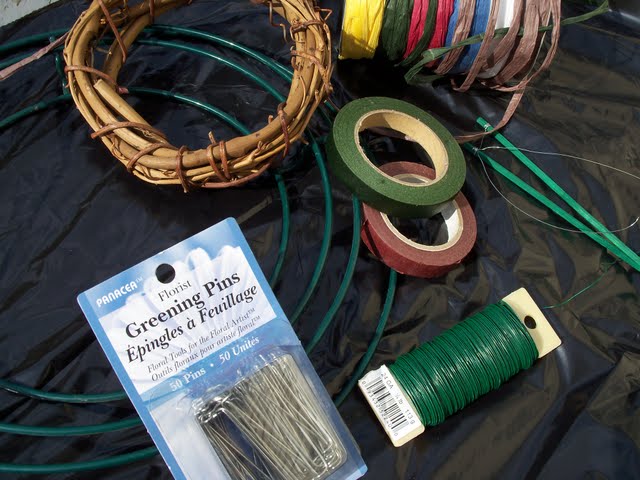
A wreath base – grapevine, rattan, foam, straw, metal
Securing material - Wire (22 gauge flexible) or floral pins (U-shaped
1.7”, greening pins) or tape (1/2” green floral tape, crepe), also rubber bands
(1”, green or the smallest size available). If you use rubber bands to secure each bundle,
you will also need wire, pins or tape to attach bundles to the wreath. (See
note below)
Hanging hardware (installed)
Scissors or clippers – Select small, sharp scissors or clippers. You may want to sculpt each bundle to make it more compact and attractive, and having small cutting tools can help with that.
Wire cutters (6” wire snips)
Ribbon and decorative elements - Raffia ribbon or something more formal is a nice touch, too. You can also add strawflower blossoms or decorative picks like birds, bees or butterflies. If the wreath is destined for the kitchen and will be used throughout the winter (my favorite), consider affixing a small pair of decorative scissors with an attractive ribbon. It's handy for snipping thyme or rosemary in a hurry.
Tip: If you don’t have sufficient plant material to fill the whole wreath, adding a bow is a clever way to use up extra space.
Personal Preferences

I usually make about five wreaths at a time and like to use six-inch bases. I prefer straw and grapevine bases. If a little of the base shows through in spots, it looks organic and like part of the design. This can be a lifesaver, especially since herbs lose volume as they dry, which may create unexpected peek-a-boo gaps.
Once the herbs are added, a wreath will increase in diameter by three to six inches, depending on the herb varieties you choose and how densely you pack them.
Note: I prefer using small rubber bands to make the herb bundles. I then wrap the bundled stems in wire to apply them to my favorite grapevine bases. Here’s why: As the herbs dry, the stems shrink, becoming less tightly bundled. I’ve found rubber bands do the best job of combatting shifting due to shrinkage, especially with herbs that have soft, moist stems like mint, lemon balm and oregano. As the stems contract, the rubber bands take up the slack, requiring less post-assembly rearranging and securing.
For next steps on assembling an herb wreath, look at my post:
How to Make an Herb Wreath - Putting it All Together. Just follow the link.
I outline how to assemble an herb wreath in my post: How to Make an Herb Wreath - Putting it All Together.
Comments
Post a Comment
Share some ideas.